My Garage
Cart
Make sure this part fits

Hyundai 49560-2B500 Bearing Bracket & Shaft Assembly

2006-2009 Hyundai Santa Fe 495602B500

Customer Questions & Expert Answers (2)
49560-2B500 Hyundai Bearing Bracket & Shaft Assembly Product Photo 1 of 1
  • Part Description
    Bearing Bracket & Shaft Assembly
  • Part Code
    49560
  • Manufacturer
    Hyundai
  • Manufacturer's Notes
    This part is discontinued.
Make sure this part fits
  • Related Parts
  • Product Specifications
  • Vehicle Fitment
  • Customer Questions & Expert Answers
  • Product Specifications

    BrandGenuine Hyundai
    Part Code49560
    Manufacturer Part Number49560-2B500
    Part DescriptionBearing Bracket & Shaft Assembly
    Other NamesInner Shaft Assembly, Shaft
    Item Dimensions21.0 x 10.1 x 6.0 inches
    Item Weight12.40 Pounds
    ConditionNew
    Fitment TypeDirect Replacement
    ManufacturerHyundai
    SKU49560-2B500
    WarrantyThis genuine Hyundai part is guaranteed by Hyundai's factory warranty.
    Shipping & ReturnShipping Policy Return Policy
    Warning: California's Proposition 65
  • Vehicle Fitment

    Year Make Model Trim & Engine Important vehicle option details
    2006-2009 Hyundai Santa FeHigh Grade|DOHC - MPI5 Door Wagon, 5 Door Wagon 7, Wagon - 5Door 5P, Wagon - 5Door 7P
  • Customer Questions & Expert Answers

    Q:
    I want to make sure that this part is correct for my vehicle. Posted by HyundaiPartsDeal Specialist
    A:
    You can Select Your Vehicle to check if 49560-2B500 fits your vehicle.
    Posted by HyundaiPartsDeal Specialist
    Q:
    How to remove and install the axle shaft in both front and rear configurations on Hyundai Santa Fe? Posted by Customer
    A:
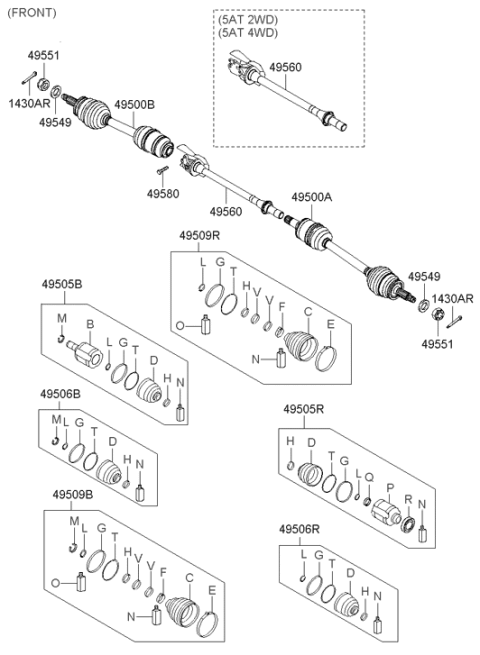
    To remove the front axle shaft, start by taking off the wheel cover or hubcap, then remove the cotter pin and loosen the axle shaft/hub nut with a long breaker bar, followed by loosening the wheel lug nuts. Raise the vehicle securely on jackstands and remove the wheel. Drain the transaxle lubricant, disconnect the wheel speed sensor and brake hose assembly, then remove the two bolts from the lower strut and steering knuckle, pulling the knuckle free of the strut. Swing the knuckle/hub assembly out until the end of the axle shaft is free; if the splines stick, tap the end of the axle shaft with a plastic hammer and support it with wire to avoid strain on the inner CV joint. Carefully pry the inner end of the axle shaft from the transaxle using a large screwdriver or prybar, supporting the CV joints as you remove the axle shaft. For installation, pry off the old spring clip from the inner end of the axle shaft and install a new one, lubricate the differential or intermediate shaft seal with multi-purpose grease, and raise the axle shaft into position while supporting the CV joints. Insert the splined end into the differential side gear, ensuring the spring clip locks in its groove with the gap facing down. Apply grease to the outer CV joint splines, pull out on the strut/steering knuckle assembly, and install the stub axle into the hub. Reconnect the balljoint to the lower control arm and tighten the nuts according to torque specifications. Install the axle shaft/hub nut with the convex side of the washer facing out, tightening it securely but not to the actual torque specification until the vehicle is lowered. Ensure the axle shaft is seated securely in the transaxle, then install the wheel and lug nuts, lower the vehicle, and tighten the lug nuts and axle shaft/hub nut to the specified torque, installing a new cotter pin. Refill the transaxle with the recommended lubricant. For rear 4WD models, begin by removing the wheel cover or hubcap, raising the vehicle securely on jackstands, and removing the cotter pin and nut from the rear axle shaft/hub. Disconnect and lower the differential enough to pry the axle shafts out, supporting the inner ends with wire. Tap the axle shafts out of the hubs with a soft-face hammer while supporting their weight. For installation, pry off the old spring clip from the inner end of the axle shaft, install a new one, lubricate the end splines, and raise the axle shaft into position while supporting the CV joints. Insert the axle shaft into the hub and install the nut finger tight, then position the differential and insert the splined end into the differential side gear, ensuring the spring clip locks in its groove with the gap facing down. Complete the installation in reverse order, tightening the lug nuts and hub nut to the specified torque, and refill the differential with the recommended lubricant.
    Posted by HyundaiPartsDeal Specialist
    If you have any questions about this product, please don't hesitate to ask us. We will be happy to help you!

Genuine Hyundai Part 49560-2B500, your Right Choice

Select the OEM Part #49560-2B500 Bearing Bracket & Shaft Assembly. It can be referred to as Axle Shaft. This part is compatible with 2006-2009 Santa Fe. Premium OEM quality parts improve performance and extend the life of your vehicle. They undergo strict quality checks and are built to Hyundai's factory specifications for proper installation.

HyundaiPartsDeal.com is a top provider of genuine Hyundai components and accessories. Looking for budget-friendly Hyundai OEM parts? Your search ends here with our wide range of genuine Hyundai products. Our economically priced parts come with the manufacturer's warranty to make sure you get your money's worth. Experience a smooth shopping journey with our fast delivery and easy return policy.

Why choose Hyundai Parts Deal

  • Dedicated Service

    Your complete satisfaction is our #1 goal

  • Lowest Prices

    Best deals on genuine OE parts from dealerships

  • Fast Delivery

    Orders are processed and delivered promptly