My Garage
Cart
Make sure this part fits

Hyundai 49501-F2700 Shaft Assembly-Drive,RH

2016-2021 Hyundai 49501F2700

Customer Questions & Expert Answers (3)
49501-F2700 Hyundai Shaft Assembly-Drive,RH Product Photo 1 of 2
  • Part Description
    Shaft Assembly-Drive,RH
  • Part Code
    49500R
  • Position
    Passenger Side
  • Manufacturer
    Hyundai
Make sure this part fits
$434.29 MSRP: $615.53
You Save: $181.24 (30%)
Ships in 1-3 Business Days
1
ADD TO CART
  • Related Parts
  • Product Specifications
  • Vehicle Fitment
  • Customer Questions & Expert Answers
  • Product Specifications

    BrandGenuine Hyundai
    Part Code49500R
    Manufacturer Part Number49501-F2700
    Part DescriptionShaft Assembly-Drive,RH
    Other NamesAxle Assembly
    Item Dimensions38.0 x 5.5 x 5.2 inches
    Item Weight17.10 Pounds
    PositionPassenger Side
    ConditionNew
    Fitment TypeDirect Replacement
    ManufacturerHyundai
    SKU49501-F2700
    WarrantyThis genuine Hyundai part is guaranteed by Hyundai's factory warranty.
    Shipping & ReturnShipping Policy Return Policy
    Warning: California's Proposition 65
  • Vehicle Fitment

    Year Make Model Trim & Engine Important vehicle option details
    2016-2020 Hyundai ElantraDOHC - TCI/GDISedan - 4Door 5P
    2018-2020 Hyundai Elantra GTDOHC - TCI/GDISedan - 5Door 5P
    2019-2021 Hyundai VelosterDOHC - TCI/GDICoupe - 4Door 4P (DR'S 1Door & Pass 2Door)
  • Customer Questions & Expert Answers

    Q:
    I want to make sure that this part is correct for my vehicle. Posted by HyundaiPartsDeal Specialist
    A:
    You can Select Your Vehicle to check if 49501-F2700 fits your vehicle.
    Posted by HyundaiPartsDeal Specialist
    Q:
    What role does the Axle Shaft play in transmitting power from the transaxle to the wheels on Hyundai Elantra? Posted by Customer
    A:
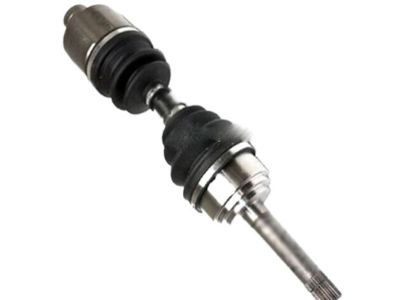
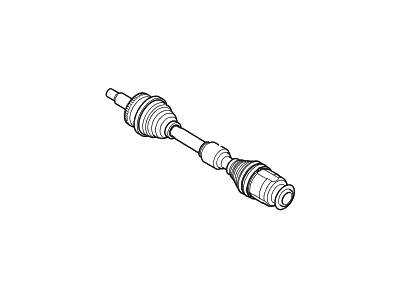
    Power is transmitted from the transaxle to the wheels through a pair of axle shafts, with the inner end splined into the differential side gear and the outer ends splined to the axle hubs, secured by a large locknut. The inner ends feature sliding constant velocity joints that allow both angular and axial motion; automatic transaxle models and 2013 and later manual transaxle models use a "tri-pot" inner joint, while 2006 and earlier manual transaxle models utilize a "ball-and-cage" type. These inner joints can be disassembled and cleaned if a boot failure occurs, but damaged parts require replacement as a unit. The outer CV joints are of the "ball-and-cage" type, permitting angular movement but not axial movement, and should be cleaned, inspected, and repacked during boot replacement, though they cannot be disassembled. If damaged, the outer joint must be replaced along with the axle shaft, as they are sold as a single component. Regular inspection of the boots for damage and leaking lubricant is essential, as torn CV joint boots necessitate immediate replacement to prevent joint damage. Boot replacement requires axle shaft removal, although some auto parts stores offer "split" type replacement boots that can be installed without removing the axle shaft, serving as a temporary fix. Ultimately, the axle shaft must be removed, and the CV joint disassembled and cleaned to eliminate contaminants that accelerate wear. Common symptoms of worn or damaged CV joints include lubricant leaks, clicking noises during turns, clunks when accelerating after coasting, and vibrations at highway speeds. To check for wear, grasp each axle individually and rotate it in both directions while holding the CV joint housings, feeling for play that indicates worn splines or sloppy joints, and inspect the axle shafts for cracks, dents, and distortion.
    Posted by HyundaiPartsDeal Specialist
    Q:
    How to remove and install the axle shaft on Hyundai Elantra? Posted by Customer
    A:
    To undertake the complete removal of the axle shaft the following must be done; Hood should be opened to expose the wheel chamber and then the following steps must be followed beginning with; Remove the wheel cover or hub cap; Undo the cotter pin. Possible methods include a socket and a large breaker bar due to the Tightness of the hub nut and if possible, the wheel that was detached should be replaced with a spare wheel and tire for better access. Unbolt the wheel lug bolts; then safely lift the car with jackstands and take out the wheel. Drain the transaxle lubricant. Pull out the link(s) between the stabilizer bar and the control arm(s); unfasten the lower control arm from the steering knuckle; loosen the axle shaft/hub nut. Rotate anti-clockwise the knuckle/hub assembly approximately till the axle shaft is clear, this may be eased by striking the end of the axle shaft with a plastic creeper bar if it is stuck. Gently push with a large screwdriver or pry bar between the bore and head of the transaxle to loosen the inner CV joint and separate the axle shaft halves; use a wooden block or your hand to support the outer end of the axle shaft. During installation, replace the old spring clip of the inner end of the axle shaft and lubricate the differential seal of the axles to be inserted thereafter, the axle shaft must be lifted upwards in such a way that the spring clip opening of the CV joint points upwards. Insert the splined portion of the inner CV joint to the differential side gear securing it with the spring clip in place. Slide a suitably sized wheel stud through the hub hole, thread the nut onto the stud and tighten; coat the outer CV joint splines with grease; finally push outwards on the steering knuckle assembly before fitting the stub axle into the hub. Thread the balljoint stud into the steering knuckle and pull up the nut and then tighten the pinch bolt. Put on the axle shaft/hub nut that fastens to the hub and tighten it-but not all the way to torque spec until the car is lowered. Furthermore to confirm that the axle shaft is well seated in the transaxle, use the inner CV joint housing to pull it. Attach the link(s) for the stabilizer bar, put the wheel and the lug nuts, bring down the vehicle and thereafter thread in the lug nuts to the desired torque. Last, using a new cotter pin, secure the axle shaft/hub nut to the torque then reinstall the hub cap or wheel cover of the car and fill the transaxle with the standard lubrication.
    Posted by HyundaiPartsDeal Specialist
    If you have any questions about this product, please don't hesitate to ask us. We will be happy to help you!

Genuine Hyundai Part 49501-F2700, your Right Choice

Select the OEM Part #49501-F2700 Shaft Assembly-Drive,RH. It can be referred to as Axle Shaft. This part is compatible with 2016-2020 Elantra, 2018-2020 Elantra GT, 2019-2021 Veloster. Premium OEM quality parts improve performance and extend the life of your vehicle. They undergo strict quality checks and are built to Hyundai's factory specifications for proper installation.

HyundaiPartsDeal.com is a top provider of genuine Hyundai components and accessories. Looking for budget-friendly Hyundai OEM parts? Your search ends here with our wide range of genuine Hyundai products. Our economically priced parts come with the manufacturer's warranty to make sure you get your money's worth. Experience a smooth shopping journey with our fast delivery and easy return policy.

Why choose Hyundai Parts Deal

  • Dedicated Service

    Your complete satisfaction is our #1 goal

  • Lowest Prices

    Best deals on genuine OE parts from dealerships

  • Fast Delivery

    Orders are processed and delivered promptly