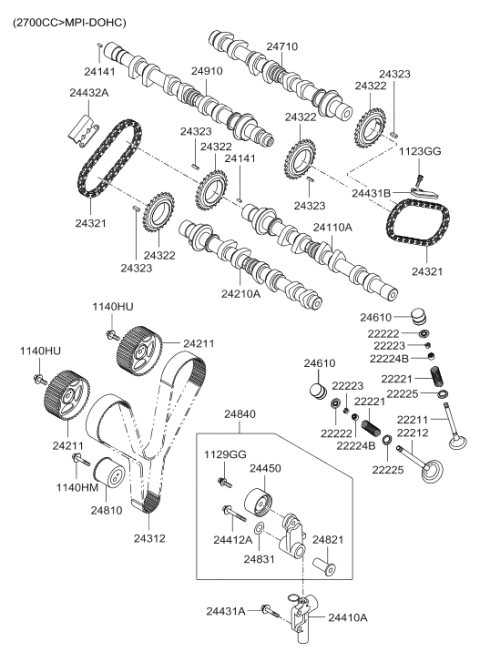
Remove the connection from the negative terminal of the battery and situate the number one piston on the top dead center on the compression stroke with the marks on the camshafts and valve covers pasted on the camshaft sprockets up. Take out the drivebelts and the alternator, then unbolt and take off the valve cover and water pump pulley. Remove the timing belt cover; if the timing belt is to be reused, make sure to label the timing belt so as not to arrange the mark s improperly. Ensure that the engine does not move from TDC specifically for cylinder number one, because rotation of the crankshaft might lead to contact between the piston and the valve. Take out the timing belt tensioner and the timing belt; identify its pulley flange in order to reassemble it accurately. If necessary, camshaft sprockets can be eliminated with the help of respective bolts while the camshaft is being held. To lock the left balance shaft, use a screwdriver to place it into the block and to take off the nut of oil pump sprocket and the right balance shaft sprocket bolt. Do not overlook to take out the tensioner and the inner timing belt; this part also requires the marking of the pulley flange. Inspect each part for signs of wear or damage, replace the timing belt and inner belt if necessary and inspect the pulleys, sprockets and tensioner. Depending on the model and whether the inner crankshaft pulley was removed, reinstall it on the engine you just identified while making sure that it's properly oriented; on the end of the right balance shaft, apply oil, place the shiny end towards the engine; using the torque specs found in the Parts Catalog, tighten all bolts and fasteners with a torque wrench. Line up one of the orientation marks on the right balance shaft sprocket with one of the corresponding marks on the crankshaft sprocket with the engine mark. Specifically, place the inner tensioner with proper emphasis on the pulley and check the marks timely. In turning the tensioner to fit back, ensure all the timing marks are lined appropriately, with no shaft rotation when tightening the tensioner. Push forward on the small projection on the upper right side of the belt to ensure the belt moves correctly, then re-attach the outer crankshaft sprocket and the flanges' bolt. Make sure that the screwdriver is still there to fasten the balance shaft, next is the oil pump sprocket together with the nut should be tightened. Refit the camshaft sprockets and torque the sprocket attaching bolts. Tighten the tensioner gradually, securing it in the collapsed state with wire before it is used. Loosen the tensioner pulley bolt and align the camshaft pulley marks with for the valve cover marks, dowels upward. Route the timing belt on the pulleys in sequence and ensure that all the timing marks are lined correctly. Ensure that the distance at which the screwdriver has been inserted in the left side of the engine is appropriate in regard to the position of the oil pump/balance shaft before you pull out the screwdriver and replace the plug. Take out the wire from the tensioner, turn the engine two times with your hand, then let go, feel the resistance and ensure that the plunger of the tensioner protrudes. Thus, the procedure of assembly should be carried out in the reverse order of the disassembly process.
Posted by HyundaiPartsDeal Specialist